Pages

Beholden To None

Thursday, November 29, 2012

One of MY Favorite Things: Mod Podge Sparkle


If you were with me on Tuesday, you know that this week there's been a bit of a shift in things here at Beholden To None because I came across something simply awesome~ and just had to share it! =))  ...And if you were here, THANK YOU for reading, sharing, and participating!

Originally, here at Beholden To None, Tuesday was Thursday and Thursday was Tuesday (shades of the beloved Dr. Suess,, isn't it?! ;])... But today IS Thursday, and now Thursday's are set aside for a hodge-podge of good craft related fun complete with a revolving array of artist features, interviews, critiques, craft fair venturings, giveaways and contests, and reviews... So today, I am going to write the article I started writing for Tuesday: a product review of one of my new favorite things! =)

I just HAD to publicly express my utter passion for something I found, quite serendipitously...

This adventure begins with an integral part of my craft and art supplies arsenal: Mod Podge... Who doesn't L.O.V.E. Mod Podge, right?!?! =oD  I personally use it for SO many things, and it IS a critical ingredient in the items in my AmrcnWldFlwr Etsy Shop, and I am finding new projects and new ways to use it nearly every day...

YES, I might be just a little addicted to Mod Podge 
"Hello, My name is StacyLynn...." ;oP

 Recently, while standing in the aisle in Michael's [anybody else spend WAY too much _____ there?!?!], I was educating myself on the plethora of different color label's in the Mod Podge line...

Mod Podge CS11240 Starter Pack, Set of 2-Ounce Bottles
Some of the many 'shades' of Mod Podge

I discovered that they now have a product that shimmers with all that glitters: Mod Podge Sparkle!! =oD

Ladies and gentlemen, my new passion...
Mod Podge Sparkle- by Plaid

Okay, can just say right now that I definitely have an ongoing (tasteful ;oP) relationship with glitter- in all forms- but especially glitter glue! =)  I adore it.  It helps make pretty things prettier (although, admittedly, it can make things tacky or trashy, or unruly, depending on your propensity ;oP heeheeh), and I couldn't possibly do what I do without it. =)  I do, however, think that it is a fine line you walk, for sure, when glitter gets involved with anything... But I think I do all right~ What do you think??


But now, thanks to Mod Podge Sparkle, my mind is officially blown- and my love affair with Mod Podge continues...  And if I thought it couldn't get better, it has certainly deepened to a whole new level!! =oD  

Standing in the aisle at Michael's, I was intrigued (to say the least!), so I bought a small 2 FL OZ bottle, just to test it out... HOLY KAUW!!  I totally should have invested in the hefty 16 FL OZ bottle (and will), because I can't. stop. using. it. ...Literally: CAN'T. STOP. ;oP  (Is that bad??!)  I am constantly creating new projects so I *can* use it! ...And for some things, it's simply the perfect finishing touch~ giving just the right affect...


I can't say that it replaces the original Mod Podge formula- by any stretch of the imagination.  But when you need "just a little something" to make your creation "complete" (is any work of art ever REALLY done?!? ;oP) , "Sparkle" just might do the trick for you.  I know it has absolutely been a wonderful addition to my crafting and art fun!! =)  THANK YOU Mod Podge!! =oD

What are some reasons YOU love Mod Podge?? =) 

Until next time...
May your imagination light your way,
~xo~ StacyLynn a.k.a AllAmrcnWldFlwr [Flower]  
Wednesday, November 28, 2012

Wordless Wednesday, 112812

“On Wednesday, when the sky is blue,
and I have nothing else to do,
I sometimes wonder if it's true
That who is what and what is who."

~Winnie-the-Pooh~       ~A.A. Milne

Welcome to Wordless Wednesday! =)  I hope you're having a wonderful middle of the week...

Today's pictures probably won't need any commentary~ you might even recognize your humble abode in them ;) ~ but my roommates and  I are in total agreement: a craft store threw up in our house! heeheeh ...But BOY, are we having FUN!! =oD  

 Check it out...


And that doesn't *even* count all the LEGOs downstairs!! ;oP 

What's your Wordless Wednesday look like?? =)  

May your imagination light your way,
~xo~ StacyLynn a.k.a AllAmrcnWldFlwr [Flower]

Tuesday, November 27, 2012

Welcome to Tithing Tuesday!! =)


I just LOVE the creative process~ with it's inherent fluidity and serendipity...
Don't you?!? =))...

Tuesday's here at Beholden To None were originally going to be a hodge-podge of various articles to include artist features, interviews, critiques, craft fair venturings, giveaways and contests, and product reviews.  And THEN a happy accident this morning led me to a wonderful discovery, that has quite literally shifted the entire schedule of this blog. =)  The above content will now be found on Thursdays, which I have now traded with Tuesday, as Thursdays were originally set aside for what will now more appropriately be named "Tithing Tuesday."  Let me explain...

I had originally wanted to run a weekly spotlight featuring of a charity, cause, or movement that I hold dear or speaks to me, and help spread the word~ a "Pay It Forward" kind of thing.  And then this morning, I came across an NPR article that made me stop, take notice, and realize that things here needed to be shifted around a bit, and it needed to start today.

Today, November 27, 2012, is the inaugural celebration of "Giving Tuesday," in the tradition of "Black Friday" and "Cyber Monday," but in a much needed counterbalance, in my opinion.  The holiday season which is traditionally about giving and goodwill, officially kicks off in a day of giving thanks, on Thanksgiving Thursday, and is then followed by two of the biggest consumer shopping days of the year.  Now there is a movement to add one more national day to the calendar, serving as a reminder of what the heart of the holiday season is all about, and as a catalyst for encouraging people to live up to that philosophy as well as helping them find ways that best suit them to accomplish this tenet. 

Enter #GivingTuesday...
World Homeless Day

#GivingTuesday is the brainchild of 92 Street Y, a New York City-based community and cultural institution, creating it as "the day America comes together to give back."  The main idea is for communities, companies and organizations, and us as families and as individuals all to do whatever we can, whatever we are able, to give back~ be it through donating monetary resources, time, or knowledge~ because everyone can find some way to help someone else~ everyone.  As the #GivingTuesday website mission statement says: "#GivingTuesday™ is a campaign to create a national day of giving at the start of the annual holiday season. It celebrates and encourages charitable activities that support nonprofit organizations."

When you visit the #GivingTuesday site, http://givingtuesday.org, you are able to find a background on the project, its founders, its participating partners, and all the many ways you can spread the message, as well as participate yourself.  If you write a blog, own a business presence online, or are at all connected in the social media sphere, they have ways for you to be a part of something bigger than yourself throughout the holidays, and help others to do the same~ and really live the "goodwill toward man" part of the holiday season! =)

Needless to say, I am a big fan of this idea, and of the people organizing the rally to make the holiday season a more authentic and genuine experience by putting giving back, helping those in need, service and goodwill up front and center in our minds.  I hope you and yours will stand with me and mine this holiday season and make it the first of many to come squarely centered in generosity and service, where it should be, beginning with #GivingTuesday! =))


And don't forget to support the wonderful founders of this concept, 92|Y, by visiting http://www.92y.org/GivingTuesday and looking around! =)

Imagine what we can accomplish collectively, one person at a time...
Thank you!!  =)
Happy Holidays- whatever lights your soul, and however you celebrate it this season!!

May your imagination light your way,
~xo~ StacyLynn a.k.a AllAmrcnWldFlwr [Flower] 

Monday, November 26, 2012

Make Something Monday, 112612

Happy "Make Something Monday"!! =)


I hope everyone had a wonderful holiday, embracing the truest sense of Thanksgiving... Reflecting on life's many blessings- both big and small- and honoring, as well as expressing gratitude for them... I know I did, and am!! =)

Today, on "Make Something Monday," I am continuing to be actively thankful, especially for life's little things~ especially when they are found in my kitchen's pantry and I can make pretty things with them!! =)  Today's project falls in just that category: Salt Dough Ornaments!  Not only is this activity actually on my "to-do" list for today, but it is made entirely of simple things I already have on hand.

If you're like me, your mind probably reaches back to your childhood at the words 'salt dough'...  While this is definitely a fun craft to do with the littlens in your life (I can hardly wait to be able to share this project with my nieces and nephews!! ;)), today let's focus on the Big Kid fun, shall we?? =oD

So, before I can even think about beginning a new project in the kitchen, I *have* to clean it... Only to make it dirty again, I know, but is it just me, or do your best efforts start with a clean canvas?? ;)


And a bit of music is a must!...


Next, let's gather our supplies.  For this project you will need:

  • flour
  • salt
  • warm water
  • large mixing bowl, measuring cups, and a mixing utensil
  • rolling pin
  • bamboo skewers or straws (something that can make a hole for your ornament's hanger
  • cookie cutters
  • stamps or markers, and whatever you might want to decorate your ornaments)
  • a cookie sheet
  • ribbon or yarn


After a few tries at this, and a bunch of online research, I decided on my favorite ratio of ingredients for the dough- from two wonderful blogs I happily discovered~ here and here.  I was really inspired by both of these articles (as well as the blogs as a whole), and have since taken their guidance and run with it! (It's just not in my nature to simply follow for very long! ;oP )   

The best recipe I have found is:
1 cup flour
1/2 cup table salt
1/2 cup warm water

Now, depending on how big a batch you want, the recipe can easily be altered~ the ratio works both up and down.  In fact, for today's project, I am going to make just a half batch.  This will, depending on the size of your cutters, yield approximately 22-28 ornaments.  

Before we begin, preheat your oven to 200 degrees- or its "warm" temperature setting.  Technically, you can simply set your finished ornaments out to air-dry (which takes a day or so, depending on the amount of moisture in the environment), but if you put them in the oven they are ready to finish decorating in approximately 2-4 hours.  

Now, add all your ingredients, and mix it well- till it is about the consistency of pizza or cookie dough.  I mixed mine by hand (about three-four minutes), but if you have a mixer, please, by all means use it. =]   

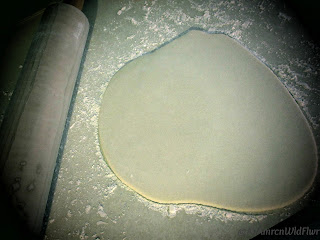
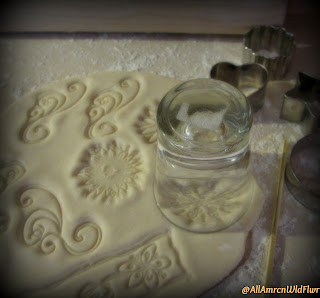
Pick out which stamps and cutters intrigue you, and pull them out.  Roll out your dough, and stamp your designs directly on the uncut dough.  Then, use your various cutters to create wonderful shapes and designs.


You can get creative with the "cutters" you use, depending on the effect you are trying to achieve (as you can see I used a shot glass to fit a particular stamped piece).


You can either use color stamp pads when you stamp out the dough, or you can wait to decorate the ornaments until after they are dry.  Each option gives different affects.


Don't forget to use your skewer to add the hole at the designated top of your ornament (and try to keep that in mind with placement of both your stamps and cutters), so you can hang these beauties when they are done! =oD  

After you've made all your cuts, place the ornaments on a (very) slightly oiled cookie sheet, and pop them into the oven...


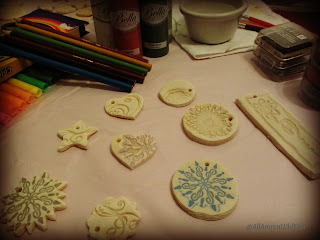
And in a few hours... The fun continues...


Okay, so how fun and easy is that?!?... Don't you just see yourself making bunches of these?? =)  I know I do... and have! ;)

Okay... Now to fit in a workout and get some dinner... All this creative work in the kitchen has made HUNGRY!! ;oP  heeheeh

Have fun~ and please feel free to show off and share your wonderful salt dough creations! =)
Until next time...
May your imagination light your way,
~xo~ StacyLynn a.k.a AllAmrcnWldFlwr [Flower

Wednesday, November 21, 2012

Wordless Wednesday


Welcome to Wordless Wednesday! =)
“Words and pictures are yin and yang. Married, they produce a progeny more interesting than either parent.”
~Dr. Seuss

One of the features I am going to be posting regularly is a "Wordless Wednesday."  It could be anything in picture form, and sometimes there will be a theme.   Wordless expressions often say so much more than any words that may accompany them, as well as begin (or continue) conversation where words alone may sometimes fail.  ...Forms that will be found here will cover an aspect from the creative side of life, or simply living creatively~ the sky's the limit...  The only "rule", if there is one, will be that the imagination is inspired in some way! =)

I would also like to encourage you to add an element of "creative pictures" into your Wednesday, and feel free to share them, as well! =)  I have set up a Flickr account specifically for this adventure, and I invite you to join me in expanding your creative expression.

Thanks for accompanying me on this journey! =)  Now, here's today's Wordless Wednesday:

the gourd-eous colors of autumn =)

Happy Thanksgiving!
May your imagination light your way,
~xo~ StacyLynn a.k.a AllAmrcnWldFlwr [Flower]

Make Something Monday, 112112

[Please forgive the technical error that caused this "Monday" post to arrive on Wednesday... I am still working out the newbie-glitches. =)  Just pretend for a few minutes that it is Monday again... I know, that's asking a lot (Mondays are oh-so-fun, aren't they?! ;]), but please bare with me; It'll be worth it! ;oD Thanks! ~"@~>~" ]

Creativity is allowing yourself to make mistakes. Art is knowing which ones to keep. 

~SCOTT ADAMS

Most Mondays here at Beholden To None/ AmrcnWldFlwr Designs are going to be "Make Something Monday"'s... I am going to run an entertaining [hopefully ;)] tutorial - something crafty, something creative, something fun to Make. =)  

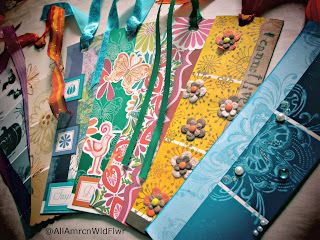
Today, I think I will kick things off with a personal favorite: Paintchip Bookmarks! =)

As a certifiable bibliophile, this one is near and dear to my heart, and they are SO cute, SO easy, and SOO much fun to do!

So here we go:


First, you'll want to gather up all your supplies...


  • paintchips (you can find these at any hardware store)
  • colored and scrapbook paper (or other fun sources of pretty paper like old cards, magazines, calendars, etc)
  • Stamps and coordinating stamp pads
  • markers/colored pencils
  • ruler
  • scissors
  • glue
  • hole punch
  • ribbon, yarn or string
Choose your paintchip.
Go with what inspires you. Use color(s) you are drawn to~~ this will help you choose what stamps and pretty paper to use with it to complete you masterpiece! =)

Use your paintchip as a template to cut the paper you choose to the right size. 


 In this case, I am choosing to use the same paper on the back and the front ( a rarity for me, actually). I also tend to cut my pieces just a tad "over sized" and then trim them to fit once I have attached them to the paintchip and the glue has dried, just to make sure everything I want covered, is.

Glue the pieces you cut out onto your paintchip in the fashion that you are looking for.
front side

back side


Once you've reached this point, technically you could stop right here, punch a hole and add your ribbon, and enjoy your new book mark! =) It's simple, it's functional, and it's pretty! 

I, however, have never been one for "leaving things be" (which is probably how I got here ;) ), it's just not in my nature! ;oP 
SO, I am going to take it a step further, add a stamp and pretty it up a bit more... =)


Next, you'll want to use a hole punch of your choice to set a hole near the top of your bookmark, to lace your ribbon through. 

In the past, I have used both regular and decorative punches. For this demonstration, I am going to use a regular 'ol office handheld 1-hole punch (ask me how difficult it was to find one of those bad boys!?)... As with the entire project, you can use whatever you've got around to do the job. =) 

Select what yarn, string or ribbon you'd like to adorn at the top of your bookmark, and affix it to complete your masterpiece! 


Voila! Now you have a beautiful bookmark! =0D


    These paintchip bookmarks make wonderful gifts, thank you's, stocking stuffers, card inserts, or keepsakes (you could even hang them on your tree during the holidays! =0D...


    And I love this project because it really can be as simple or as elaborate as you are inclined to Make it.  Even children can have fun with this craft- I think it can be very kid-friendly.

    SOOO~ *HOW* fun is that?!  =oD

    Please let me know what you think, and I would love to see photos of any beauties you create, as well! =)   

    Thanks for stopping by!
    Until next time...
     May your imagination light your way,
    ~xo~ StacyLynn a.k.a AllAmrcnWldFlwr [Flower]