
Happy Patriot's Day! =)
Welcome Back to Make Something Monday!! =)
It's Tax Day today here in the United States, so with that in mind, I decided to have a little fun with origami! =)


Today's Make Something Monday project is an origami dollar bill ring!
Lots to do today, so let's get started! =)
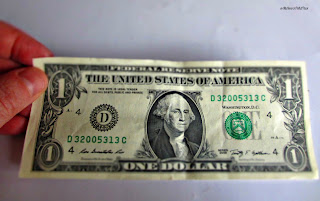
First, all you'll need is a U.S. one dollar bill. This project can be done with just regular paper, and I've included a fun video at the bottom to help you with that if you decided you want to get crazy with this one and really go creative. For today's purposes, though, I am simply concentrating the project on using a dollar bill. In case you've never seen one of these before, the finished product looks like this:

These are always a fun thing to make at parties, or when you are out at a restaurant. ;)
Take the dollar bill in your hand, lengthwise, face up.

Now turn it over, so the back side is what you are looking at.


Fold down (away from you) the top edge of the bill, at the line that borders the backside design.


Now, fold over towards you the top edge (as you are looking at it) to meet the bottom edge (that you created in the previous step.

Then slip the top edge into the "lip" of the bottom edge, and secure by making sure your top crease is sharp.
(picture the motion you make with a match book.)


Next, fold the bottom edge up to meet the top edge, so that you bill looks long and skinny, and "The United States Of America" is showing.


Be sure your creases are sharp.
Now, square out the "1" that will show on top when the ring is finished. To do so, first, fold back the edge of the bill, so that your crease is at the border line (like you did across the top of the bill in the first step).

In order to complete your "square" around the "1", fold the length you have on the right side around the back until you have created your square, and crease.
Okay, now we have to give our ring some shape. Hold the square that you just created, and wrap the length that's left back around your finger, over to the right, then around your finger, to give the rest of the bill some "curve."


As the bill is wrapped around your finger, press it gently to keep the rounded shape.


When you release it, the bill keeps it rounded shape. =)


Now to "fit" the ring.
Looking at the words "The United States Of America" again, fold the length up in between the o and f of the word "of." Make sure your crease is sharp.


(If you find that you want to make the ring size a bit smaller, then fold somewhere in the word "States." If you want it larger, fold it somewhere in the middle of the word "America.")
Now, follow the curve that we gave the ring, and bring the "1" in line with the straight edge we just created.
It's important for the next step that the edges are lined up.


Open the "1" square, and fold the straight portion down so that it runs along the edge under the "1" square.

Then fold the "1" back into place, and tuck the short left edge of the "1" under the length you just folded down.


Then fold the "1" back into place, and tuck the short left edge of the "1" under the length you just folded down.


Next, fold the length back up the ring's edge, into the middle, and flatten it up against the backside of the "1."

Create a little pocket at the top of the "1" square with your fingers. Fold the flap that's left into the pocket. (You can use a pencil or the end of a utensil to help you fit the excess into the pocket.)

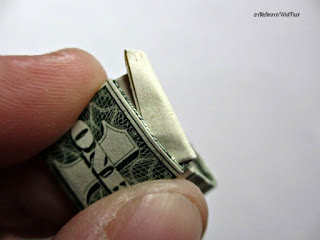


And Viola! =) The "1" Ring. ;oP


How fun, right?!?
As I said, this one will go over pretty well at parties and the like. It's fun, and it's interactive (ie- use OPM! ;) )!

This video from Rob's World on YouTube was the inspiration for this tutorial. As I promised earlier, he has information on how to do this project with plain paper (the details are necessary because you won't have the border lines, the words, or the "1" to guide your folds and measurements, but you can get really creative and draw up anything that pleases you! =) ). Be sure to check out his YouTube Channel, too. He's got lots of fun stuff there! =) Here's the video:
Have you ever made one of these rings before? Got pictures? Don't be shy~ Share! =)
Until next time...
May your imagination light your way,
~xo~ StacyLynn a.k.a. AllAmrcnWldFlwr [Flower]
No comments:
Post a Comment
Show, Share, and Spread the Love... Thanks! =)
~xo~ "@~>~"